Keeping your WordPress site up-to-date with the latest features and user status is important for developers. However, with the right setup, you can offer an enhanced experience to your users and keep them engaged. In this ultimate guide, we will show you how to set up user status in WordPress so that you can give your users the best experience possible.
Here, we will cover basic steps such as adding new users, setting custom roles and permissions, and enabling notifications. We will also explain more advanced features like creating custom user fields and setting up automation.
Following the steps in this guide, you can easily set up a comprehensive user status system for your WordPress site. You can keep track of who is visiting your site, what type of content they are consuming, and more. That way, you can give visitors a tailored experience that helps them get what they need from your site quickly and easily.
The Importance of Updated User Status in WordPress Site
Having an up-to-date user status is essential for keeping track of your WordPress site’s users. It provides a reliable way to check whether a user’s account is active and can access the site.
- There are several advantages to keeping your user status updated:
- It allows you to quickly identify inactive accounts and free up resources on your server.
- It can help you proactively monitor suspicious activity or potential security threats.
By keeping the user table in your WordPress database clean, you can ensure that any changes made to WordPress users will be accurately reflected in the system.
If you are looking for a comprehensive solution for user status in WordPress, excellent plugins like New User Approve are available. These plugins allow you to easily create, manage, and update user profiles on your WordPress site with just a few clicks. They even provide additional features, such as email notifications when a user’s account is inactive or suspended, giving you greater control over the security of your site.
Understanding the Different User Statuses in WordPress
It’s important to understand that WordPress comes with several different user statuses. Understanding them and how they work is the key to creating an effective user status system on your WordPress site.
The three critical user statuses available in WordPress are:
- Pending users
- Approved users
- Denied Users
It’s essential to take the time to understand the differences between each user status to set up the right kind of user system for your site.
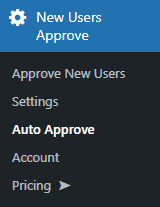
How to Approve New Users
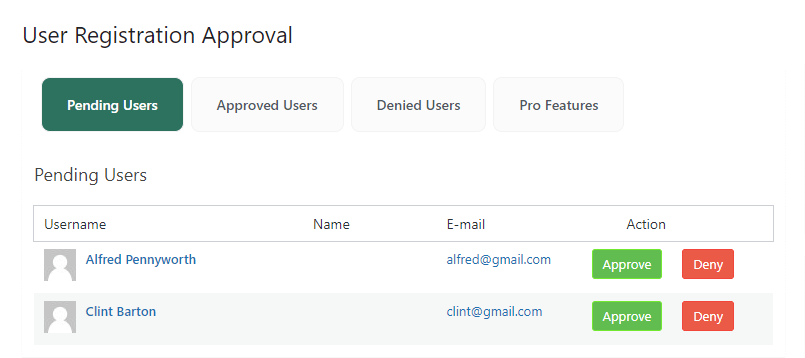
Go to the WordPress Admin and then click “Approve New Users.” Now you are on the User Registration Approval page.
Here, you will find a panel called Legacy Panel.
There are four tabs in the Legacy Panel,
- Pending Users
- Approved Users
- Denied Users
- Pro Features
– Pending Users
All registered users from the Registration page will go to the Pending Users section.
Now, the admin can approve or deny them.
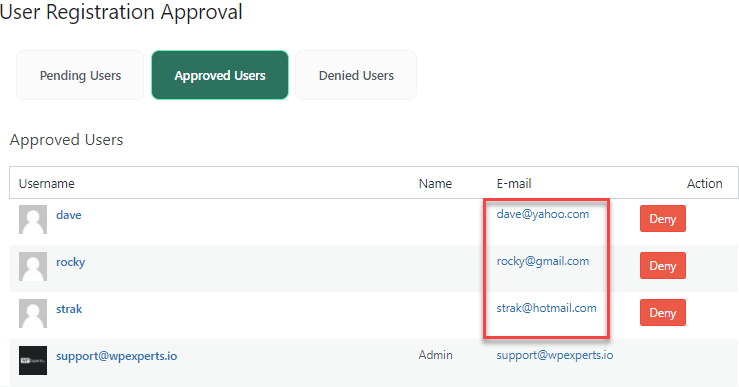
– Approved Users
Every approved user in the Pending section is moved to the Approved Users section.
Here, the admin can deny any user through the Deny button in the Action column. The user will move to the Denied Users section.

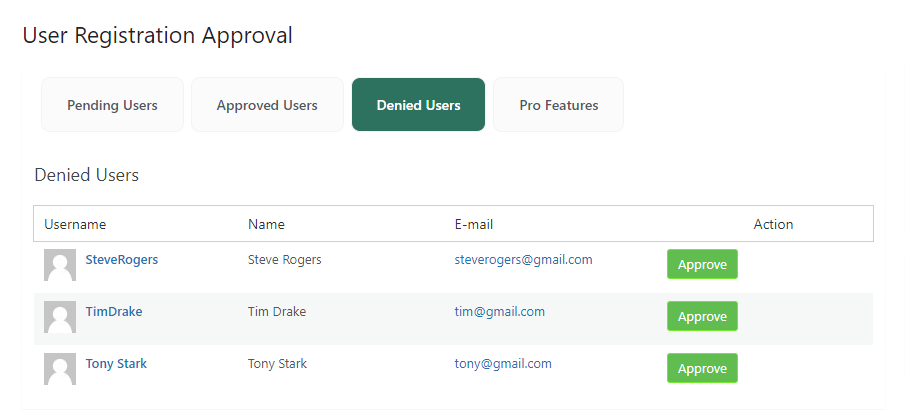
– Denied Users
All the denied users from the Pending Users and the Approved Users section are moved to the Denied Users section.
Here, the admin can approve any user via the Approve button in the Action column. The user will move to the Approved Users section.
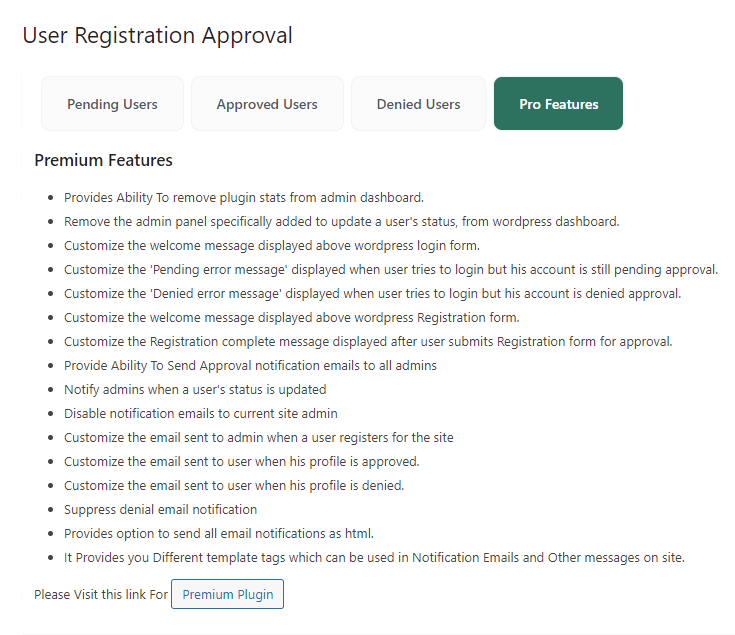
New User Approve offers some “Pro” features, which you can get by subscribing to the Premium version. See the image below to learn the enticing premium features:
How to Use an Updated User Status on a WordPress Site?
If you want to keep your WordPress site user accounts properly organized, it is important to understand how to set up and use an updated user status. This simple addition can make all the difference in managing a secure and efficient WordPress site.
Here are the steps for setting up an updated user status:
- Log into your WordPress dashboard and scroll to the “Users” section.
- Select the “Add New” option on this page’s top.
- Enter the username, password, email address, and other details as requested by your site.
Scroll down to find the “User Status” drop-down menu. Here is where you can select one of three options: “Active,” “Inactive,” or “Pending” for each user profile you create on your WordPress site.
How to Send Auto Approve Email Notification When a User’s Status Is Updated
Go to Admin Dashboard -> New Users Approve -> Auto Approve.
Now you are on the Email Domain page.
Here you will get two tabs, Whitelist and Blacklist.
– WHITELIST
For domain addition that needs auto-approval, it will be specified in the whitelist tab.
You can enable the option by clicking a toggle beside the “Enable Whitelist” option.
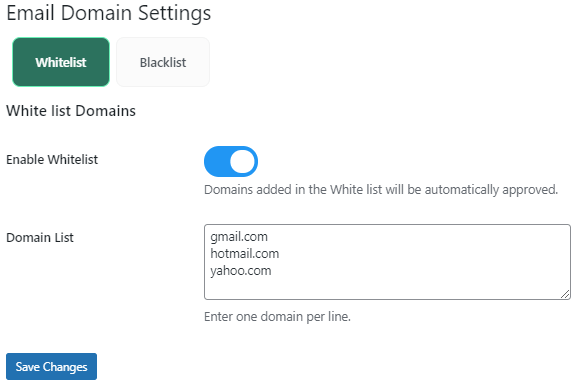
Click “Save Changes.”
From the Admin panel, you can verify and check which user has got approved by navigating through Dashboard -> New Users Approve -> Approve New Users.
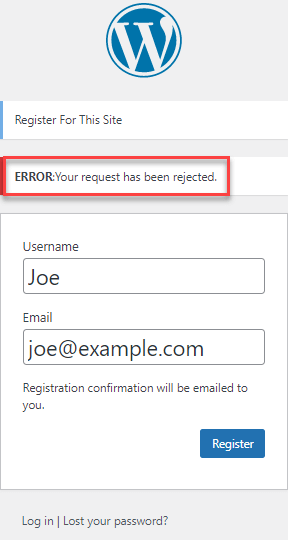
– BLACKLIST
You can restrict registration requests based on the email address’ domain name. You can add them to the blacklist tab to reject the request for registration from the specific domains provided in the blacklist.
You can enable the option by clicking a toggle beside “Enable Blacklist.”
Click “Save Changes.”
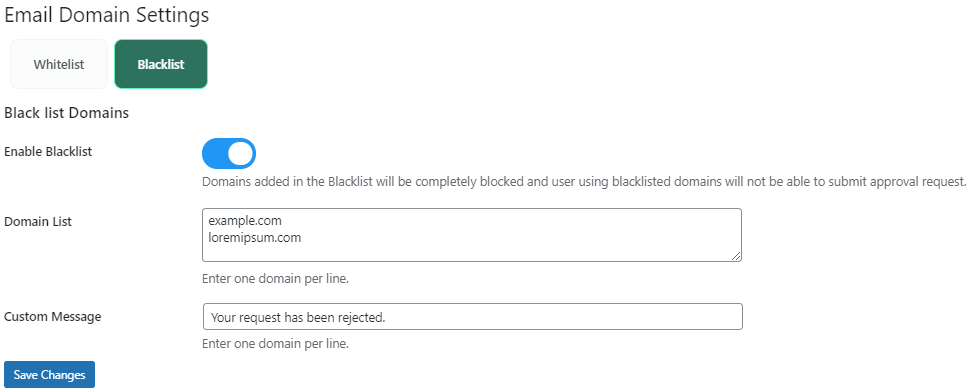
After getting the option enabled and saved, anytime a person attempts to register using an email ID with a blacklisted domain, their request will be denied, and a customized message will appear.
Once everything is configured, each time a user’s status is updated—for example, when they are promoted from a trial account to an active account—the plugin sends an email out so that admins are aware of the change in status.
Using User Status Notifier ensures that no changes go unnoticed and all involved parties stay current on the latest user statuses in your WordPress site.
Wrap Up
Setting up user status in WordPress is a powerful and convenient way to keep track of user activity on a WordPress site. With the proper setup and implementation, you can create a smoother user experience by giving admins and developers a better understanding of who’s active, who’s inactive, and who should receive notifications. Moreover, this feature can automate user-based processes like banning users, sending notifications, and suspending accounts. With the help of this comprehensive guide, you are now well-equipped to get your WordPress site up and running with user status.